How To: Install a Campervan Stove?
People have been living in vans for as long as there have been vans; long before that, groups of nomads have been travelling from place to place for as long as there have been humans. Recently the #vanlife movement has exploded online, with pictures of converted vans from the most basic mattress-in-the-back job to full-on luxury conversions packing Instagram feeds and travel blogs all over the internet. Major news outlets like the New Yorker and Forbes have charted the takeoff of #vanlife, but although the hashtag may be new, people have been living this way for a long time.

Downsizing
With the cost of living skyrocketing, more people than ever are joining the off-grid movement, downsizing to vans, yurts or benders. Some choose to be completely off-grid, growing their own food and using solar panels. Others keep their jobs but live completely mobile, using the internet to work remotely from wherever in the world they are. With improvements in mobile internet speeds, the last few years has seen the rise of the 'digital nomad': web developers, artists, designers and all sorts of other professions who carry out all their work over the internet.
If you're thinking about packing it all in and living on the road, there are lots of resources out there on how to make money living remotely, from advice on how to manage your time to tips on finding work. Another option is seasonal work based where you are: fruit picking, bar work, or any other skills you've got that you could make use of.
Kitting out your van
Start with the basics: you need a bed, a way to cook food, somewhere to sit in the daytime if it's raining. A good amount of storage so you're not tripping over your stuff. Keep cooking equipment to the basics: one good knife, a chopping board, mixing bowl etc. If you're living in your van, you'll need a way to keep it warm (unless you're based in a warm country that doesn't get too cold at night, or you're just sleeping in your van over the warmer months).
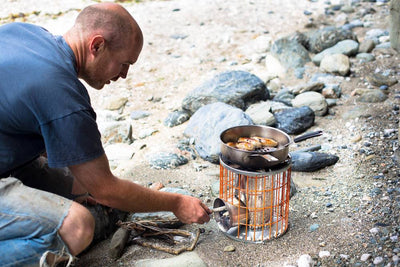
There are a couple of options for heating small spaces: either a gas heater, or a woodburning stove for a van. A small woodburner can be a great option for keeping cosy during winter, although it's less 'stealthy' than a gas heater. In terms of fuel, you can source wood for cheap or free from lots of places if you keep an eye out. Wood as fuel is a sustainable, carbon-neutral option, especially if you're burning dried and seasoned wood, approved for burning under current legislation to bring about cleaner air for us all.
The benefits of a van stove
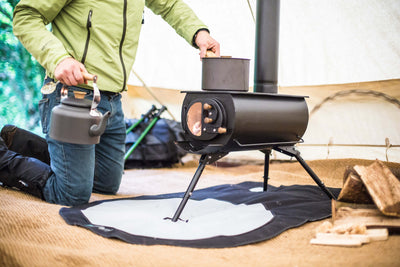
A van stove has two major benefits: it keeps you warm when it's cold outside and it gets rid of damp. The dry heat from the stove will stop damp building up inside the van, especially in the walls if you have insulation. It also gives you something lovely to do in the chilly mornings and evenings: the ritual of lighting the woodburner and watching it catch is, in our opinion, one of the best possible ways to start the day. We design all our stoves to be cooked on as well as for heating, so you can boil a kettle or make your breakfast on the stove while it warms up your van in the morning.

What do I need? The most commonly-used flue size for van installations is 4-inch (100mm flue), however our Shepherd stove, at 1.7kW heat output, has been specifically designed with very tiny spaces in mind, and works best with 3" Insulated flue. We recommend using insulated flue, as this prevents accidentally touching the hot flue in a small space and is much safer, as the outside temperature of the flue will be cooler. When fitting a stove in a van, you need to be mindful of how close your stove and flue is to combustibles (basically, anything that will burn). Using insulated flue reduces the distance that you need between your flue and combustible materials.
To get started, you'll need:
- A stable base for the stove to be bolted to. Most often this is done as a plinth with handy log storage underneath. A non-combustible barrier will be needed to form the "shelf".
- A small woodburning stove, like our Shepherd Stove
- 3" Insulated Flue Kit, which includes all the flue parts and fittings you need (this includes enough insulated flue to clear the top of the van by at least 15cm in a "standard" installation, and allows for the top section to be unclipped and sealed with a flue cap whilst driving, and then clipped back on with ant-downdraft cowl whilst stationary)
- A flashing kit designed for a solid roof (this provides a watertight, heatproof seal around the flue where it exits through the roof (included in our 3" Insulated Flue Kit - and will differ in angle depending on the pitch of your roof)
- A cowl to prevent rain from coming down the flue (included in our 3" Insulated Flue Kit)
- A heat shield
All you'll need is to pick your stove, and add a heat shield (or corner heat shield, if fitting the stove in a corner). Our Shepherd stove has been safety tested with a rated heat output of 1.7kW and is an ideal choice for spaces of around 28 cubic meters or less. Contact us if you have any questions about your space!
How to install a stove in a van
To install a stove in a van, first you need to decide where it'll go. Make sure your van is big enough for a stove to be fitted safely, without being too close to anything flammable or in the way. Safety distance to combustibles is an essential factor in this decision. Our Shepherd stove, for example, has the following safety clearances:
To the rear of the stove: 250mm
To either side of the stove: 300mm
Installing a heat shield allows this distance to be reduced by about half (125mm).
Once you've picked where it'll go, decide where the flue is going to exit the roof. Make sure to leave room around the flue where it exits through the roof - our specifications are 60mm distance from the insulated flue surface to any combustibles.
Before you start, get all your parts and tools together so everything is handy. Put the stove in place, observing distance to combustibles and assemble the flue, so you can see exactly where you need to cut the hole. When the stove and first few sections of flue are in place, use this to find the middle of where the flue will exit on the inside of the van. Drill a hole straight up through this point and any insulation layers, exiting the roof. This will be the middle point for the flashing kit placement.
Take the flashing kit and use it as a stencil on the outside of the roof, using the newly-drilled hole as centre point, and draw around the inside of the hole. Using a jigsaw or an angle-grinder, cut around the inside of the circle you've drawn (you might need a drill to get the hole started). If the roof of your van is insulated, you might need to repeat this on the inside, making sure to line the holes up and leaving at least 60mm between the outside of your flue pipe and the edge of the hole.
Move the stove outside to cure the paint while you follow the steps above: attach a metre of flue and light the stove using the curing packs included (it's better to do this outside than in your van, as the paint will give off some fumes while it cures).
Get the flashing in place on the outside roof and seal down with silicone sealant. Once that's done, finish up with self-drilling screws to secure the flashing to the roof. Push your flue up through the flashing kit from the inside, and attach the cowl. Finally, join the flue to the collar at the back of the stove.
Safety
When using a woodburning stove in any small space, common sense is key. Always make sure you've got a working carbon monoxide alarm fitted near the stove, according to guidelines. Check your stove and flue regularly to make sure everything is in working order. Always use insulated flue to ensure a good draw.
As mentioned, the most important thing to think about when fitting a stove in your van is distance to combustibles: it's likely that your stove is going to be near a wall at the very least. Make sure any walls or cupboards the stove is near are protected with a heat shield (either fireboard or an aluminium plate with an air gap behind it).
Choose a small wood stove, as you won't need a huge amount of heat in your van.
One more safety tip: think about your flue height. If you've got a high-roofed van, be aware of the height of your cowl when driving under bridges or height barriers. We've had a fair few customers come back a week after installing a stove in their van to get a replacement cowl after it was ripped off by a low bridge or tree branch! If your cowl is too high, think about replacing it with a flue cap when you're driving to stop this from happening. Just remember to remove the flue cap before you light the stove.

Some photos of great installations
The best part of living in a van is the freedom to choose: you can be as remote as you like, waking up in the Scottish wilderness with no phone signal in sight, or parked next to the beach for a day of working online. We get to meet all sorts of interesting individuals who've downsized their lives and opened up a whole new world of adventure - and some who've been doing it their whole lives. Big vans, tiny vans, surf vans, vans for whole families... we love them all. If you're converting a van, feel free to send us your pictures or pop in to Anevay HQ in Redruth, Cornwall.
If you're looking for a campervan stove or you'd like to fit a stove in your van and you're not sure which one would be best or what you need, feel free to get in touch and we'll help you out.
DISCLAIMER: This blog serves as general information and it is important to remember that every space is different and will need to be carefully considered when installing a woodburner. If you're unsure of what you're doing, consult an expert. Always have a carbon monoxide alarm fitted near the stove.